The 08:15 regional train to the lakes leaves in nine minutes and I am standing on the platform with a bag that has been rubbing the same strip of my shoulder for forty minutes. That was my first backpack: a 25 litre daypack bought from a shop window because it looked like the one in the brochure. It was the wrong size for what I carried and the wrong shape for my back, and I paid for both mistakes over the next two hundred kilometres of trail. If you are choosing your first serious pack, the goal is not to buy the most famous one. It is to buy the one that fits the trip you are actually planning, and to know which numbers on the spec sheet you can ignore.
I have lived in three countries and I have stopped trusting the person in the outdoor shop who wants to sell me something bigger. What follows is the version I would give a reader who is about to spend real money: the questions to answer first, the four pack types that cover almost every trip I have made, the size bands I would defend, and the strap-by-strap checklist I run before I leave the fitting corner.
Answer five questions before you look at a single pack
Every decision that follows depends on the trip, not on the pack. Write the answers down, even on a napkin, because the shop will want to sell you on the pack before you have thought about the trip. Where are you going, and what will the ground under you be like? When are you going, and what will the weather actually do to you there? How many nights are you out, and how much are you willing to carry? What equipment does the trip genuinely require, as opposed to what you hope to use? And lastly, how strong are you, honestly, because a pack that is comfortable at eight kilos on a flat path is a different animal at eleven on a ridge.
These are not decorative questions. A winter mountaineer spending a month on the slopes of an eight-thousander and a round-the-world traveller who expects to do little more than the odd day hike have almost nothing in common, and a single pack cannot serve both. The trip’s purpose informs every part of the buying process that follows.
The four pack types that cover most of my trips
Daypacks (15-25 litres). For day hikes, city breaks, or as a secondary travel bag, you want something light and big enough for the essentials without encouraging you to overpack. Look for a padded back panel, bottle pockets, and enough internal organisation for valuables, snacks, waterproofs and tech. The daypack I keep at home is a Jack Wolfskin Island at 20 litres, 0.69kg, with a roll-top for weather resistance and a padded 15in laptop compartment. It is light enough for travel and has the practical hiking touches, like a sternum strap, that you stop noticing when they are done right.
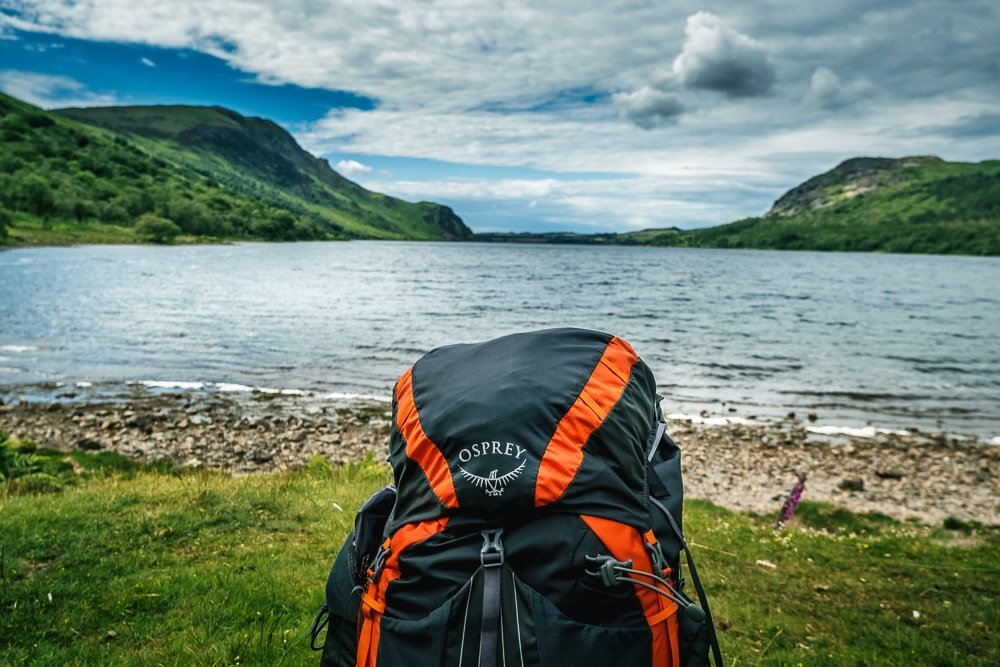
Trekking packs (30-50 litres). The workhorse. Mine is an Osprey Exos 38 at a touch over one kilogram, which has done most of my camping and trekking trips, including shorter wild camping and a winter mountaineering weekend. At 38 litres it holds a sleeping bag and lightweight gear and still encourages me to keep the weight down. There is a lighter route if you pack less: a 45 litre pack can weigh as little as 800g. Trekking packs in this class are strong and weather-resistant, but the whole point is that they stay light and stable. They should be well ventilated and full of stretch-mesh and stuff pockets, because you will always have one more item that needs a home.
Expedition packs (70 litres and up). For long carries in harsh environments, bigger and more durable. The expedition pack I took to Denali in 2024 was an 85 litre Osprey: large enough for high camp carries, with a removable lid so it compresses down to carry-on size for flights. The fabric is thicker and heavier than anything above, and the shoulder straps and hip belt are correspondingly more padded, because you are carrying more for longer, and you need external accessory straps and storage panels to keep the load organised.
Adventure travel packs (with wheels). The crossover between backpack and suitcase, built for active trips that still involve airports. They combine the carrying features above with a laptop compartment, a zippered shoe pocket, and a separate wet or muddy gear compartment. The exteriors are more rigid than a hiking pack, and some, such as the Osprey Farpoint Wheels 36, come with wheels. If your trip is mostly trains, stations and city mornings, this is the category I would reach for before a trekking pack.
Size: the three bands I would defend
Preferences vary, but these are the reference points I would trust, and they map directly onto the trip length you wrote down on that napkin.
Weekend, 1-3 nights: 30-50 litres. If you are only escaping for a short break, staying lightweight should be the priority. Be efficient, leave the luxuries at home, and never ignore the ten essentials. A lighter pack means more ground covered and fewer aches when you sit down in the evening.
Multi-day, 3-5 nights: 40-70 litres. These are the most popular packs and they cover most eventualities. They work for backcountry skiers, day-trippers and overnighters, and they suit long-term travellers who carry more than the average vacationer. This is the band where most of my reading, my own packs and the packs I recommend to friends live.
Extended trips, 5+ nights: 70 litres or larger. Packs this size are the usual choice for winter activities lasting more than one night (warmer clothing, thicker sleeping bags, 4-season tents with heavier poles), longer wilderness trips that need more supplies, expeditions in harsh environments, and adults travelling with children, because one of you ends up carrying most of the kit anyway.
If I only had to remember one number, it is this: 40-70 litres is the band that does not regret itself. Everything smaller is a discipline exercise, everything bigger is a commitment.
The features checklist I run in the shop
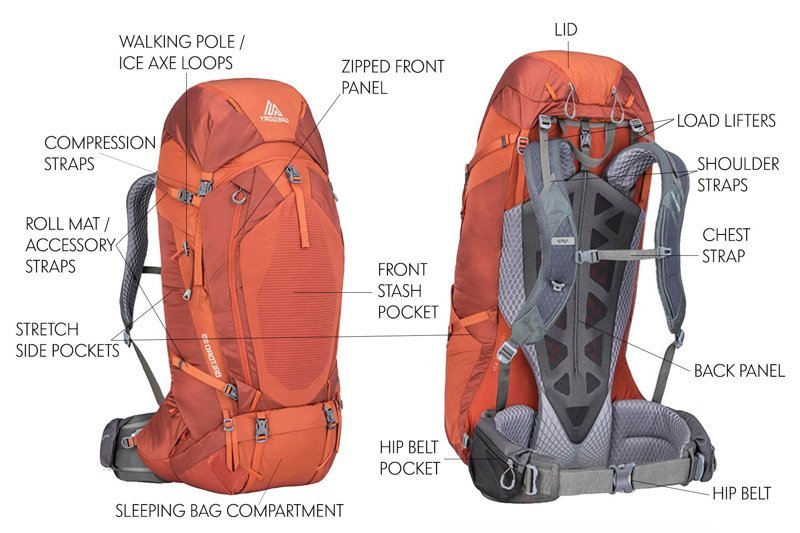
Not every pack has all of these, but this is the list I work through with my hands on the straps, because a spec sheet does not tell you how a load lifts against your body.
Walking pole and ice axe loops keep your poles where they will not swing into you. A zipped front panel opens the main compartment from the front instead of forcing you to empty the top. The lid is usually a pocket for quick-access items at the top, and on some packs it removes to save weight or to wear as a small hip pack. The load lifters look like an afterthought, but they connect the shoulder straps to the top of the frame and are how you stop a heavy pack from pulling away from your back, keeping the weight centred on your hips. The chest strap stops the shoulder straps from slipping and should be adjustable in both position and length.
Shoulder straps get thicker padding as packs get bigger; thinner straps offer more flexibility, and mesh improves ventilation. The back panel should be contoured, padded, adjustable, and built with foam channels for cushioning that also lets air move. For warm weather hiking, a suspended mesh system vents better. The hip belt is the one that can make or break a long day: fitted well, it distributes the weight so your shoulders do not ache; fitted badly, it becomes a band of misery around your ribs. Bigger packs carry beefier padding for a reason.
The rest is storage, and storage is where a pack earns or loses its keep: hip belt pockets for phone, wallet and gloves; a front stash pocket for a jacket, guidebook or rain cover in changeable weather; a sleeping bag compartment at the base, usually separated by an internal divider, which keeps the organisation sane; stretch side pockets for water bottles; roll mat and accessory straps for a mat or a tent, which is where I keep my tent; and compression straps to stabilise the load when the pack is not full, which is more often than you think.
Fitting is the part most people skip
This is arguably the most important aspect of choosing a backpack, and the one most people treat as an afterthought. Get it right and you have a pack that is comfortable, supportive and stable in all conditions. Get it wrong and shoulder, hip and back pain are almost certain, usually within the first full day.
The step everyone rushes is measuring your back length, which sets the torso size the pack was built for. I am not going to re-draw the measurement diagrams here; Osprey’s own fitting guide walks through it clearly and I would rather link you to a proper one than hand-wave it. The point is that a pack in the right size range is not the same as a pack in the right size range for you. The load lifters, the hip belt, and the distance of the straps from your body all assume a specific torso measurement, and the shop’s fitting corner exists for exactly this.
The extras that matter less than you think
A few of the features the spec sheets love to lead with are, in my experience, worth less than the fit.
Waterproofing: fully waterproof packs, especially large ones, are rare because they need lots of stitching and zippers and, being open at the top, have a hole in them by design. What you actually get is a tough, durable fabric with some water resistance, which can take a water-repellent treatment, or which is more sensibly protected by a removable rain cover. My default is to pack the gear in waterproof stuff sacs and not worry about the shell. Hydration reservoirs are a genuine upgrade for hot, dry hiking; the sleeve is in most packs and the reservoir is sold separately. Security matters when you are backpacking through cities and transport hubs abroad, where a slash-proof mesh net and a padlock are cheap insurance. And streamlining for airports is a real, if small, problem: packs fall foul of conveyor belts and end up in the oversized area, so a flight cover makes flying easier and keeps the kit a touch safer.
If you only have one weekend, skip the big pack and do the 30-50
Here is the trade-off I would actually make. If you are choosing between a big expedition pack you might one day use and a 30-50 litre trekking pack you will use this month, buy the smaller one. You can grow into a 70+ litre pack; you cannot easily put a 70+ litre pack down when the trip is a weekend. The 15-25 litre daypack handles the city days and the short trails, the 38-45 litre pack handles the nights out, and anything beyond that is a decision you should make with the trip in front of you, not with a wish.
Next time I would change one thing: I would have fitted the first pack on the platform, not in the shop, with the exact weight I expected to carry. The bag that looks right on a shelf is not always the bag that sits right on your back at the weight it will actually hold. That is the only test that counts, and it takes about ten minutes with a sandbag or a duffel of books strapped on.